
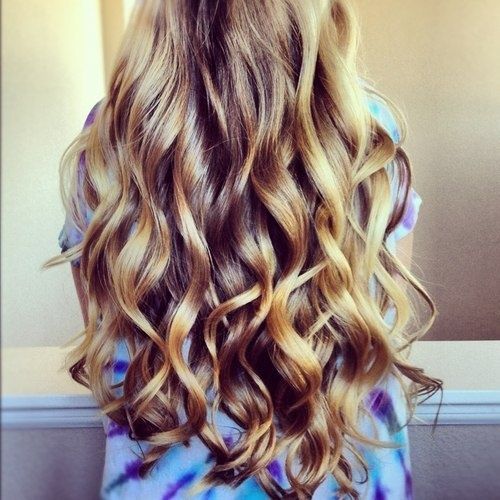
How To Create The Perfect ghd Curls
Are you in possession of a new ghd straightener? Lucky you! Or, perhaps you've had one of the brand's key products for years, but have only managed to master sleek, smooth straightening. Don't you worry -- creating those luxe ghd curls you've seen everywhere is actually easier than it may seem.  Styling curls with a ghd straightener takes a completely different approach to using a regular curling iron or wand. Thankfully, ghd straighteners are easy to use and feature a whole host of conveniences that will make your experience even better. Keep on reading to discover a step-by-step guide to creating the perfect ghd curls.
  We've broken down the process of creating ghd curls into seven easy steps, suitable for any hair type and length. Our styler of choice for this is the ghd Platinum Styler, but any of the models will do the job -- the Platinum is simply an expert at keeping heat distribution at an optimal level, so it prevents against damage while you style.
  Of course, a ghd straightener like the Platinum or IV Styler isn't all you can use to create gorgeous ghd curls. The brand are the experts in styling, so they know different looks require different products. Why not test out one of the curlers on offer from ghd to kick your look up a notch? We love the ghd Creative Curl Wand for total control over your locks -- it'll let you create everything from beachy waves to spiralling ringlets. Here's our six step tutorial to creating a looser, beachier take on ghd curls with the Creative Curl Wand.
How to Create the Perfect ghd Curls
Styling curls with a ghd straightener takes a completely different approach to using a regular curling iron or wand. Thankfully, ghd straighteners are easy to use and feature a whole host of conveniences that will make your experience even better. Keep on reading to discover a step-by-step guide to creating the perfect ghd curls. ghd Curls Tutorial
Using a Platinum Straightener
We've broken down the process of creating ghd curls into seven easy steps, suitable for any hair type and length. Our styler of choice for this is the ghd Platinum Styler, but any of the models will do the job -- the Platinum is simply an expert at keeping heat distribution at an optimal level, so it prevents against damage while you style. - Split your hair into sections from underneath if you have lots of hair, or if it's particular thick. Then, you'll want to go ahead and split these larger sections into 2-3cm sections as you start curling. If you have short or thin hair, you should be able to skip this step.
- Squeeze the ghd straightener plates together over your first section of hair, keeping the barrel as close to the scalp as possible, as if you were going to straighten the piece of hair.
- Pull the hair away from your scalp with the straightener, rather than straight downwards. As you're pulling away, begin to roll the straightener downwards, keeping the hair wrapped around the plates as you go.
- Keep the straightener rolling downward until the piece of hair is completely wrapped the whole way around the barrel of the straightener. Once the piece of hair is wrapped around the barrel the whole way, slide the straightener down the full length of the hair.
- Once you have run the straightener all the way down to the end, your first curl should be complete! Twirl the curl around your fingers and place as you'd like.
- Stretch or brush out the curls if you want loose waves, or coil around fingers for a tighter, more defined curl. You can also throw in product, like salt spray, to define your waves and make them appear a little more piecy. Secure the curl with light hairspray once it looks perfect.
- Repeat on all sections of hair until head is completely curled.
[product_display id="1"]
We love the traditional ghd curls for a whole host of occasions, but they've been popular in particular for weddings, formals and big events. You don't have to wear your ghd curls loose, either -- tuck them up with a hair tie for a voluminous, curly ponytail, or secure a section of the hair in a 'half up, half down' or topknot style.ghd Curls Tutorial
Using a Creative Curl Wand
Of course, a ghd straightener like the Platinum or IV Styler isn't all you can use to create gorgeous ghd curls. The brand are the experts in styling, so they know different looks require different products. Why not test out one of the curlers on offer from ghd to kick your look up a notch? We love the ghd Creative Curl Wand for total control over your locks -- it'll let you create everything from beachy waves to spiralling ringlets. Here's our six step tutorial to creating a looser, beachier take on ghd curls with the Creative Curl Wand. - Section out and clip the hair from underneath if you've got lots of hair, or if it's particularly thick. Once again, if you've got thin or short hair, you should be able to tackle it without any sectioning, although you might benefit from quickly tying up the upper layer of your hair and working from the bottom.
- Grab a section of hair, varying the thickness based on how you want your waves to appear. We recommend about an inch in width for that perfect, laid back look.
- Place your ghd Creative Curl Wand close to the root and wrap the section of hair around the barrel, away from your face. Ensure you're holding the wand vertically with the swivel cord at the top so that your curl can drop off the barrel to maintain shape when it's done.
- Hold the section in place for 5-10 seconds, depending on how thick your hair is. Let go and adjust curl as needed.
- Continue curling section by section, alternating the direction you curl in -- twirl some towards the face for a fuller, messier end look.
- When done curling, scrunch hair a little at the roots to add volume. Work in a sea salt spray, texturiser or other product of your choice if desired.
[product_display id="2"]