

How to wax your eyebrows at home like a pro!
So your regular brow lady is closed and you’re getting pretty desperate as your once sculpted brows are starting to meet in the middle and the hairs are multiplying by the day. Don't worry, we've got you! keep on reading for all the tips and tricks on how to achieve perfectly sculpted brows at home! Here are our top picks for everything you’ll need! 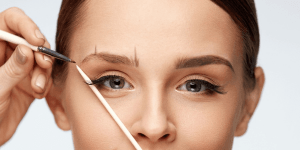 A lot of brow technicians use this method to get the correct brow shape for your face by using string or a pencil and lining it up from your nose and marking out the main three points of your eyebrows. This step will help you know where your brows should start and end based on your own face shape.
- Lycon Baby Face Waxing Kit, it's super affordable and has everything you'll need to achieve sculpted brows!
- These Caron Brow Beaters are a must-have for an easy and precise application.
- The Lycon Eyebrow Precision Tool Kit has all the essentials.
- Eyebrow pencil or powder & brow gel to finish! We have many to choose from ;)
Now that you have everything you’ll need, let’s get sculpting!
Step one – Getting prepped
Heat up your wax by having the heat setting on medium; once the wax has melted we recommend you test a patch of wax on your wrist to make sure the temperature isn’t too hot, it should feel warm and the consistency should be thick not runny.Step Two – Creating your desired shape
Brow Mapping A lot of brow technicians use this method to get the correct brow shape for your face by using string or a pencil and lining it up from your nose and marking out the main three points of your eyebrows. This step will help you know where your brows should start and end based on your own face shape.